Automating Malware Analysis using CAPE Sandbox
Preamble
I have been using CAPE Sandbox for malware analysis for several years now, having implemented CAPE into the Security Operations Centre of a large global company, and into the production workflow in a large government department where it’s used in daily operations. CAPE is a very powerful and helpful tool for malware analysis, however in my experience, it is challenging to setup and maintain. This is unsurprising, as CAPE is not a simple web application, appliance, or product. It is a free, open source, highly customisable, platform made up of hundreds of dependencies, Python scripts, configuration files, and software applications. As a consequence, a CAPE Sandbox setup can be very fiddly.
I’ve read through many blog posts about the setup and configuration and CAPE Sandbox, as well as the official Docs. I’ve found that all the available literature leaves a lot to the imagination. This likely due highly customisable nature of CAPE Sandbox, and due to the assumed knowledge of anyone who plans to undertake a CAPE Sandbox implementation. Nevertheless, I’ve intended this post to be a comprehensive walkthrough of setting up a standard CAPE Sandbox environment that should be get first-time users up and running.
NOTE: Before proceeding, read the official CAPEv2 Docs and the instructions in the official GitHub repository.
A special thanks to all the developers who have worked on Cuckoo Sandbox and CAPE Sandbox over the years!
Introduction
Malware analysis is the study of malicious software to understand it’s origin, intention, and behaviour. Malware analysis can be performed by a variety of cyber security professionals, including:
- Malware analysts and researchers can understand how malware works, and the techniques used by threat actors to evade detection.
- Threat intelligence analysts can gain valuable threat intelligence into who authored the malware and why,
- Anti-virus vendors can identify characteristics that can be used to create detection signatures and YARA rules
- Security analysts can identify indicators of compromise, such as file hashes, IP addresses, and domain names used by the malware which can then be searched across the network (for example, using SIEM, EDR, or SOC platforms) to check if any systems have been infected.
In analysing malware, there are two primary methods:
- Static analysis, which involves reading and analysing source code, which may involve decompiling files,
- Dynamic analysis, which involves executing or ‘detonation’ the malware and monitoring it’s behaviour.
Both of these can be performed manually or automatically, and both should be performed in secure environments, away from production systems and data. Typically, dynamic analysis is performed in a virtualised, ‘sandboxed’ environment. Using virtualisation allows analysts to revert the system back to a clean state, before executing the malware, so it can be reused for the next sample.
Automated malware analysis sandboxes are commonly integrated into other security products, such as email gateways, web gateways, and firewalls. This allows for files downloaded from the internet or from emails to be securely analysed for malicious behaviour before reaching the endpoint or mailbox. This process is often invisible to the user.
Intro to CAPE Sandbox
CAPE Sandbox is a popular open-source, automated, and dynamic malware analysis sandbox. It is a derivative and a successor to Cuckoo Sandbox, which was developed in 2010. You can read more about the history of CAPE and Cuckoo at the official CAPE repository. The Cuckoo Sandbox project now seems to be archived and no longer maintained, however there is a public, online version available which is hosted by the Estonian CERT, which appears to be a forked version that may still be maintained.


CAPE Sandbox is an actively maintained project, and many commercial sandbox products, such as Intezer, are actually running modified versions of CAPE under the hood. While there are many free and commercial sandboxes available, such as Joe’s Sandbox, Hybrid Analysis, Any.Run, and even the community version of CAPE Sandbox (which is apparently down at the moment due to the data centre flooding), there are several reasons why you may instead choose to build and host your own malware sandbox, including:
- Files submit to online or commercial sandboxes may be publicly viewable, or at least viewable by the sandbox vendor. This may raise concerns of sensitive information disclosure or data sovereignty.
- Some malware may be designed only to run when certain characteristics are present, such as language settings, location, time zones, whether the system is part of a domain, or only when other files or software are present (see Stuxnet). With CAPE, you can customise multiple malware analysis environments with different characteristics to see how the behaviour changes.
- Many commercial products have limitations or are expensive. The cost of deploying a CAPE environment can start relatively low.
- Availability and scalability. CAPE can be scaled up to run multiple analysis’s simultaneously, especially if leveraging Azure to run the Sandbox Guests.
Disclaimer
Care must always be taken when working with malware, even when using virtual machines and sandbox environments. Do not attempt to perform malware analysis unless you are knowledgeable in the field, and do not attempt to perform malware analysis on a system or network that you do not own (such as in your workplace) unless you have sought permission. Endure Secure is not responsible for any action taken after following the instructions in this blog post.
You are responsible for licensing your software (Microsoft Windows, Microsoft Office, etc).
Pre-requisites
Even though CAPE Sandbox makes malware analysis easier, it is still a very specialised field which requires a lot of knowledge and skills in a broad range of areas, including:
- Windows and Linux administration,
- Virtualisation and virtual networking,
- Python and other programming languages
- Bash scripting,
- Malware and executable debugging.
Sandbox Design
CAPE Sandbox supports a variety of design and deployment options. The chosen design should consider the usage and the scale of the deployment. In this section, we will cover the various design considerations.
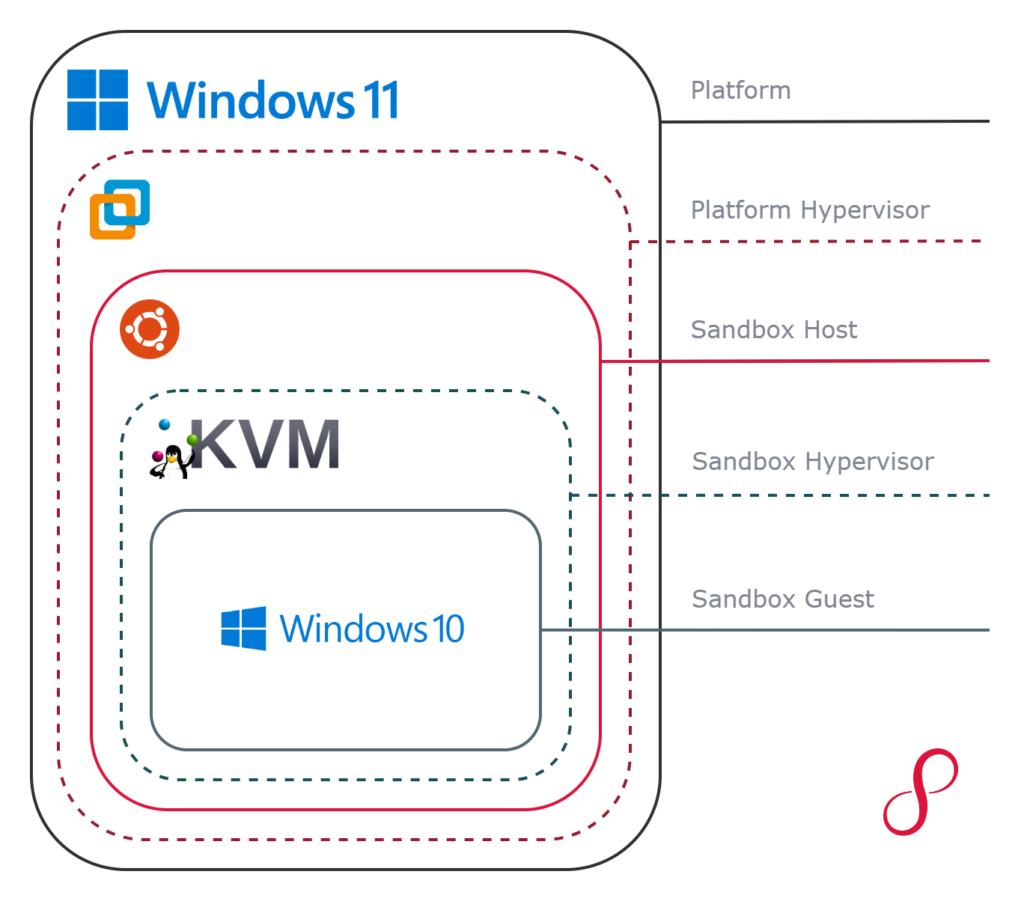
Platform & Platform Hypervisor
For a single-to-low user setup, such as for independent malware researchers, or small malware analysis teams, CAPE Sandbox can be deployed on a desktop computer running Microsoft Windows, Linux, or macOS and a type-2 hypervisor such as VMware Workstation Pro, VMware Fusion Pro, or VirtualBox.
For multi-user use, enterprise use, or where CAPE Sandbox is integrated into an automation workflow, CAPE Sandbox should be deployed on a server running a type-1 hypervisor such as VMware vSphere/ESXi, Microsoft Hyper-V, or in Azure Cloud.
I haven’t attempted this, but you could also run the Sandbox Host directly on bare metal which you may be a valid use case for. Otherwise, whichever design you choose, your physical CPU and your hypervisor must support nested virtualisation, as the Sandbox Guest will also be virtualised. You may need to enable settings in your CPU/BIOS/UEFI, and on your hypervisor. You may also need to disable Secure Boot. The following external pages may be helpful:
- Enable ASUS Motherboard Virtualisation
- Does My Intel CPU Support Virtualisation?
- Disable Virtualization Based Security for Nested Virtualization
- Oracle VirtualBox – Nested Virtualization
- VMware Workstation – VT-x/EPT or AMD-v/RVI
Sandbox Host
The Sandbox Host is the system which will run CAPE Sandbox application and the webserver, receive malware submissions, produce reports, and orchestrate the Sandbox Guest systems through a hypervisor. The CAPE Sandbox docs and the official GitHub repository suggest using Ubuntu 22.04.4 Desktop (64-bit) as the Sandbox Host.
Sandbox Hypervisor
CAPE Sandbox supports the following hypervisors which will be used to run the Sandbox Guest:
- KVM (type-1 hypervisor),
- Azure cloud platform (type-1 hypervisor – this theoretically the most scalable way to run CAPE Sandbox and is not limited by the resources of your Sandbox Host),
- VMware Workstation (type-2 hypervisor),
- Oracle VirtualBox (type-2 hypervisor).
For small deployments, it is recommended to use Kernel-based Virtual Machine (KVM). This is because KVM is part of the Linux kernel, and malware is less likely to detect that it is running inside a virtualised environment which causes some malware to behave differently in an attempt to avoid detection. A few years ago, I used VirtualBox, which is more user friendly, and it seemed to work well.
Sandbox Guest
You can configure CAPE Sandbox with multiple Sandbox Guests. The Sandbox Guest is where the malware will be detonated and monitored. The CAPE Sandbox developers recommend Windows 10 21H2 as the Sandbox Guest operating system, but I have also tested Windows 7 which worked well. CAPE Sandbox also supports Linux guests for analysing Linux malware samples.
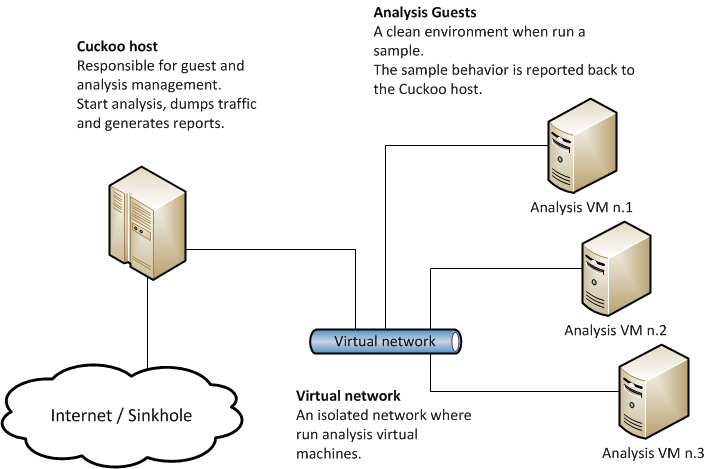
Our Design
For the rest of this post, I will be detailing the installation steps based on the following design and technology stack:
| Platform | OS: Windows 11 Pro 23H2 CPU: AMD Ryzen 7 5800X 8-Core Processor 3.80 GHz RAM: 64 GB |
| Platform Hypervisor | VMware® Workstation 16 Pro 16.2.5 build-20904516 |
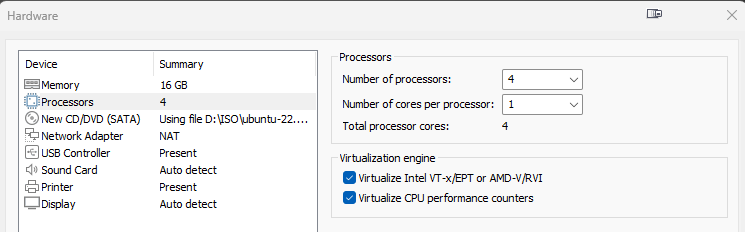
| Sandbox Host | OS: Ubuntu 22.04.4 Desktop (64-bit) Processors: 4 RAM: 16 GB HDD: 200 GB Network Adapter: NAT Virtualize Intel VT-x/EPT or AMD-V/RVI: On Virtualize CPU performance counters: On |
| Sandbox Hypervisor | KVM |
| Sandbox Guest | OS: Windows 10 21H2 CPUs: 2 RAM: 8192 HDD: 80 GB |
Note that you will be restricted for how much resources (CPU, RAM, Storage) you can allocate at each layer.
Building the Host
- Download the Ubuntu 22.04.4 Desktop (64-bit) iso file.
- Create a new VM in VMware Workstation Pro to the specs listed above.
- Start the VM and go through the Ubuntu setup. Configure for your locale and preferences. When creating a username, don’t use ‘cape’, as this user will be created automatically later.
- Once you’re on the desktop, open Terminal and update Ubuntu.
sudo apt update && sudo apt upgrade- I will also install Terminator, a customer Terminal application.
sudo apt install terminator- You may also wish to install VMware Tools so you can copy+paste between your Windows host and the Sandbox Host. You should consider uninstalling VMware Tools once you start using CAPE to analyse malware, to minimise the chance of accidentally copying malware out of your Sandbox Host.
sudo apt-get install open-vm-tools-desktop- Restart and then take a snapshot of the Sandbox Host using VMware Workstation. This is so you can revert back if there are any errors or issues during the installation of CAPE.
- The CAPE Sandbox developers have developed a script to install KVM, however this never seems to work for me, so I install it manually. I also install virt-manager which comes with a graphical interface which we will be using. We will also run kvm-ok which will let us know that virtualisation is working.
sudo apt -y install bridge-utils cpu-checker libvirt-dev libvirt-clients libvirt-daemon qemu qemu-kvm
sudo apt install virt-manager
kvm-ok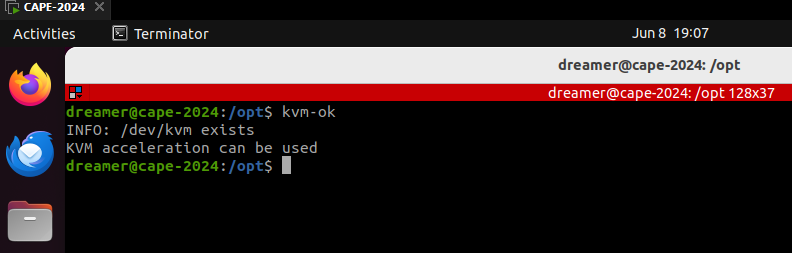
- Check that virt-manager runs without any errors. Start using sudo the first time.
sudo virt-manager
virt-manager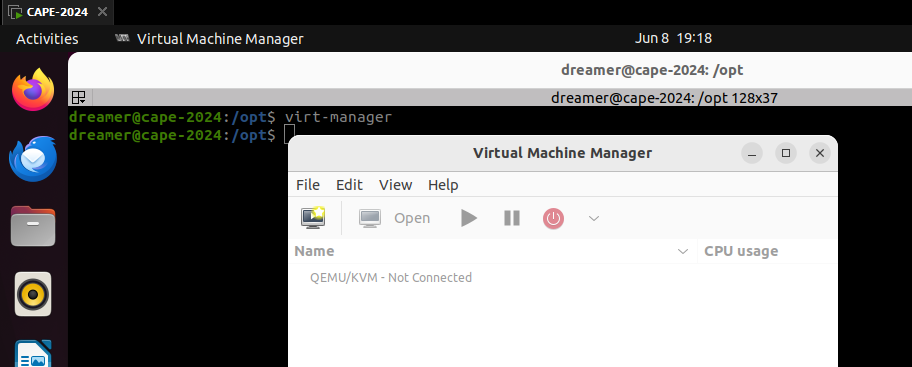
- It’s now time to install CAPE Sandbox. Download the installation script from the official repository and run it per the instructions.
cd /opt
sudo wget https://raw.githubusercontent.com/kevoreilly/CAPEv2/master/installer/cape2.sh
sudo chmod +x cape2.sh
sudo ./cape2.sh all cape | sudo tee cape.log
You may need to hit Enter a few times in response to some prompts during the installation. Whenever I run this, there are a few errors and a lot of warnings displayed, but this hasn’t prevented CAPE from running.
- The next step is to install Poetry, then use that to create a Python virtual environment and install the Python dependencies. Do not use sudo when running ‘poetry install’. You may see a permission denied message regarding poetry.lock, you can ignore this. The last command here checks that the Python virtual environment is activated.
cd /opt/CAPEv2
poetry install
poetry env list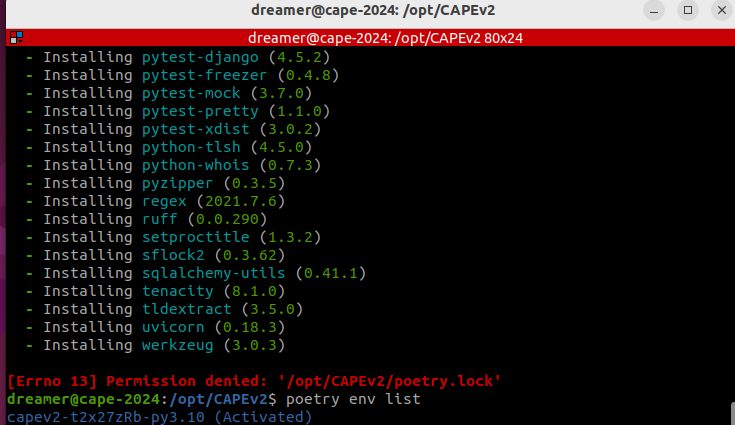
CAPE is now installed and we are ready to build the Sandbox Guest.
Building the Guest
The next step is to build our Windows 10 Sandbox Guest. We want to be able to detonate malware within Microsoft Office documents (VBA Macros), so we will also install Microsoft Office 2010, as well as other software that may be required for malware to run. Windows 10 and other software will intentionally be configured to disable all security features that would otherwise prevent malware from running property. Due to this, some malware may be able to detect that it is running inside a virtualised environment and behave differently. You may consider creating multiple guests, for example, a guest with all security enabled, a guest with all security disabled, or a guest based on your standard operating environment (SOE).
Windows 10
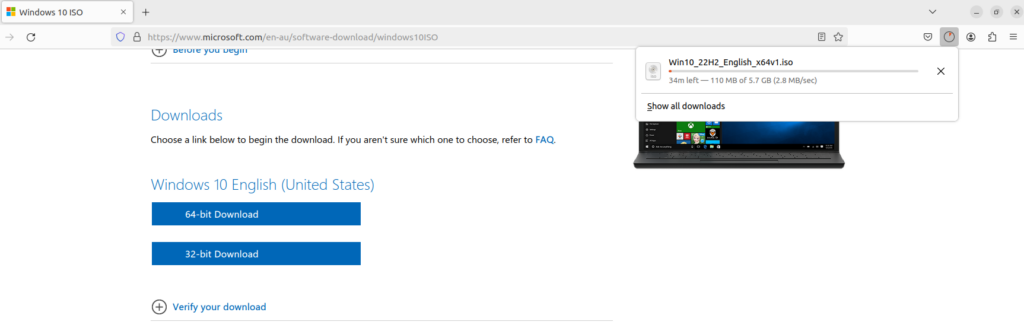
- Download the Windows 10 ISO from the Microsoft website. Do this from your Ubuntu Sandbox Host, because if you try from Windows, you can’t download the ISO without changing your User Agent. If you do need to download the ISO using Windows, you can use Rufus.
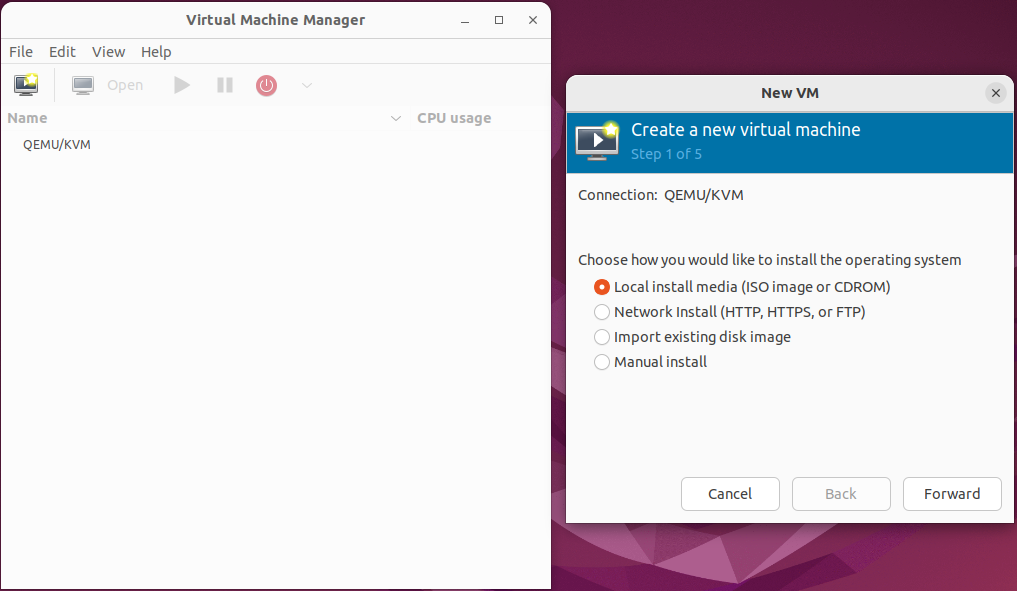
- Open Virtual Machine Manager (virt-manager).
- Click File > New Virtual Machine.
- Select Local install media (ISO image or CDROM) and click Forward.
- On the next screen, click Browse… and the Locate ISO media volume window will open.
- Click the + icon on the bottom left and the Add a New Storage Pool window will open.
- Name the pool ISO and click Browse, then navigate to and select the folder where the Windows 10 ISO file is (for me it is /home/dreamer/Downloads), then click Finish.
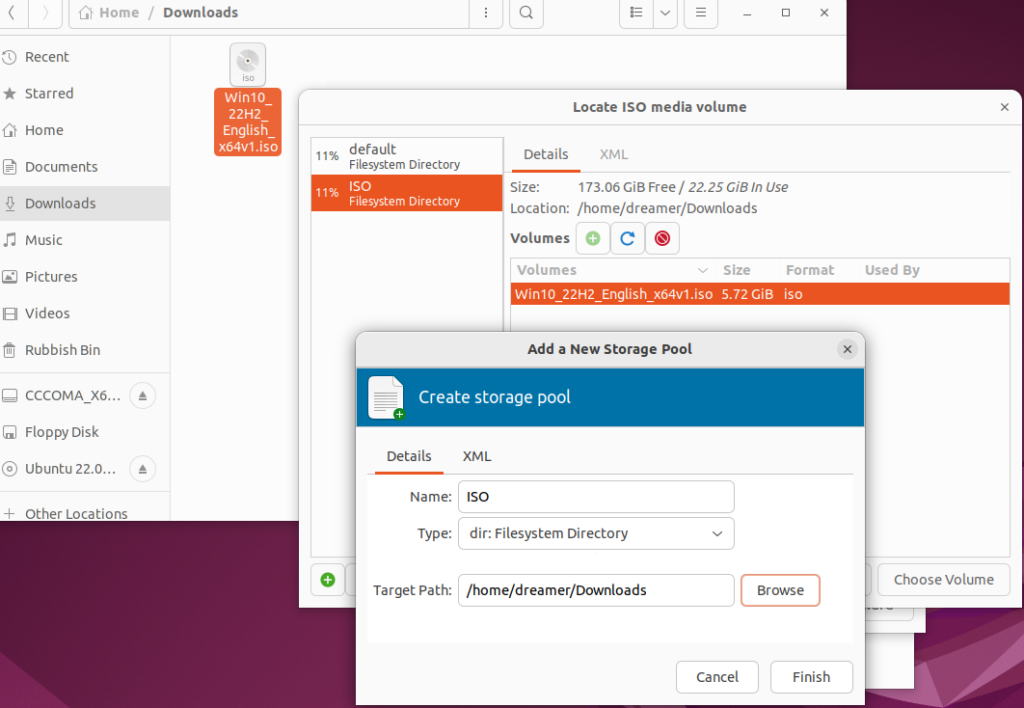
- Click Choose Volume and then click Forward back on the New VM window. If you get a dialogue asking about a search permissions, click Yes.
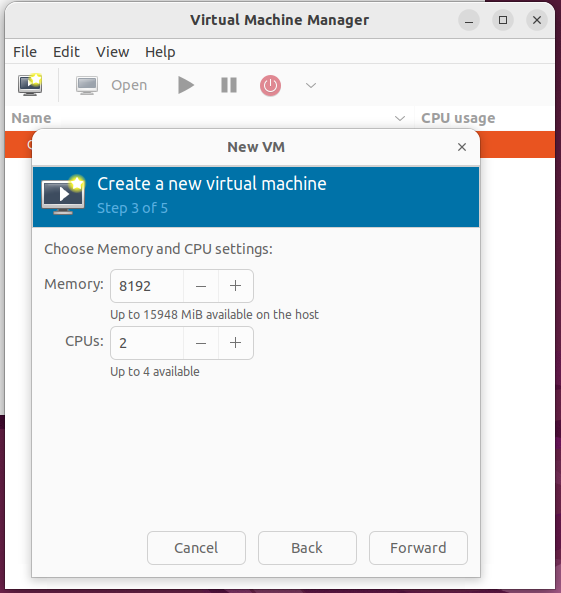
- On the next screen you’re asked to select RAM and CPU. As the Sandbox Host has 16 GB RAM and 4 CPUs, I’m going to allocate half of that to the Sandbox Guest. This can be changed later at any time, however you will always be restricted by resources the Sandbox Host (unless you’re using Azure to run your Sandbox Guests).
- On the next screen you’re asked to create the Sandbox Guest storage. Microsoft specifies 32 GB minimum storage for Windows 10. I’m using 60 GB. If you want your Sandbox Guests to live in a location other than the default, click the Select or create custom storage radio button and then create a new location. This is handy if you’re storing your Sandbox Guest VMs on a separate disk which can be picked up and moved to another VM, for example if you’re upgrading or reinstalling CAPE from scratch. Whichever the case, ensure you’re using a disk image format that supports snapshots, such as qcow2.
- On the final screen, name your Sandbox Guest and select NAT for the Network selection. The Sandbox Guest will need internet access while we set it up.
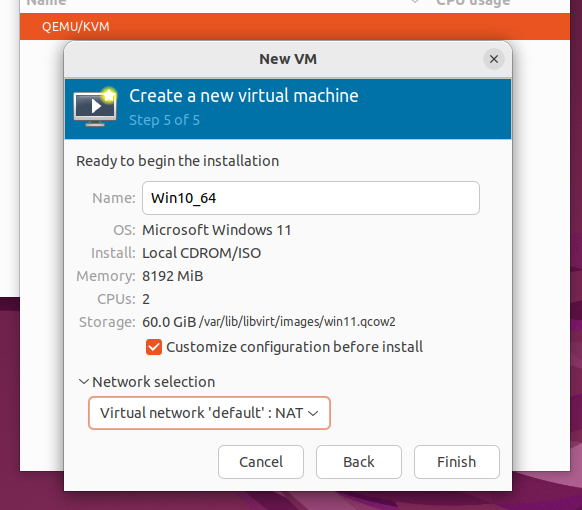
- Check Customize configuration before install. Click Finish.
- Another window will appear. Set the Firmware to BIOS in the Hypervisor Details. This is important as if you leave it as UEFI you won’t be able to take snapshots. This can not be changed later. Then click Begin Installation.
- Your Virtual Machine will start up. You will need to click into the console window and press enter during boot up to boot from the mounted Windows 10 ISO.
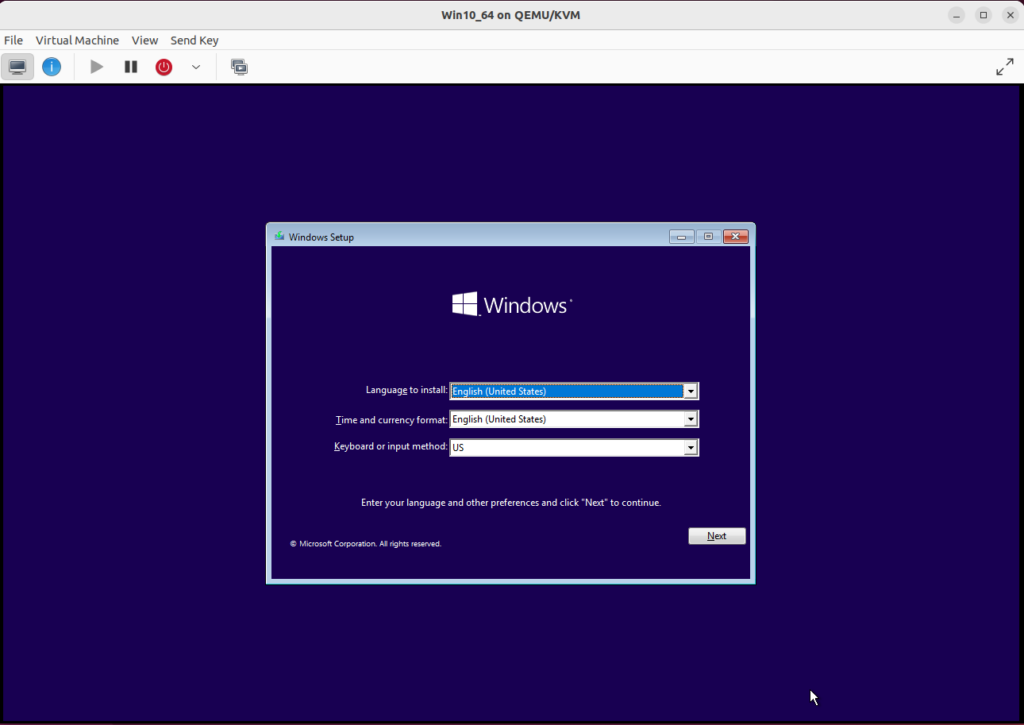
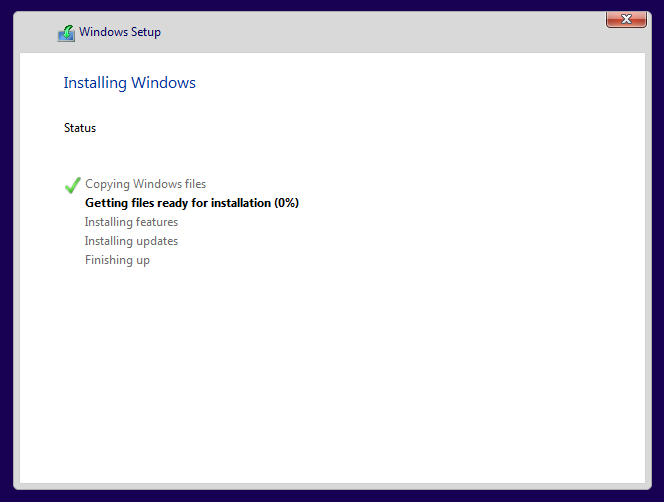
- Run through the Windows setup as you normally would: Language, keyboard layout, Windows version, license key, create and format the storage disk.
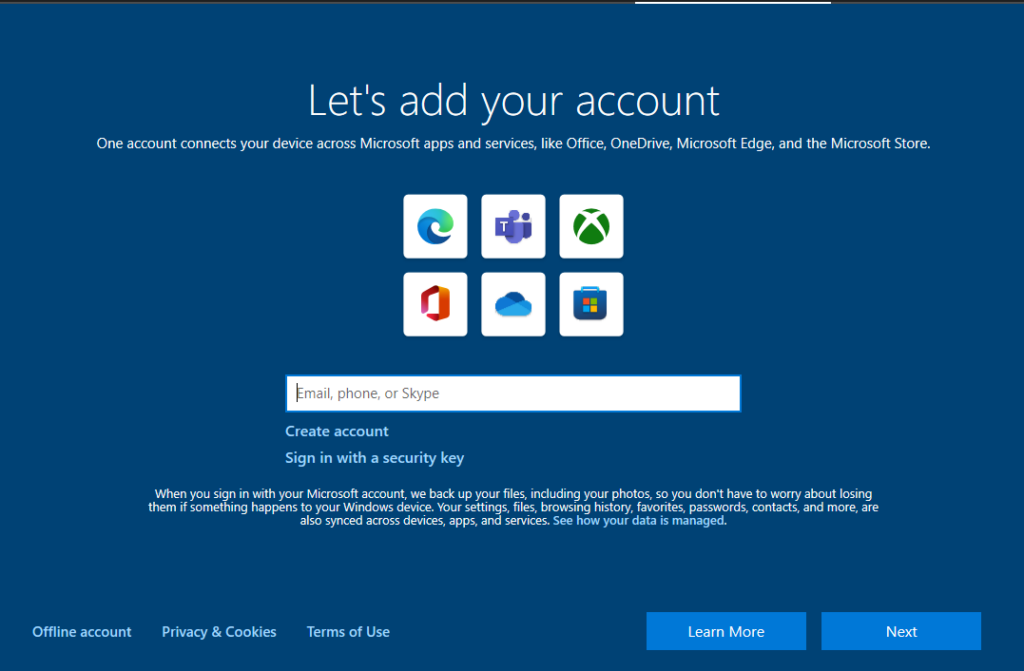
- After this screen, the Windows 10 setup will continue. Answer the prompts as required. When it’s time to add an account, I select Offline account. Microsoft will use some dark patterns to try and convince you to use a Microsoft account instead, which you could do, and it may appear more realistic to malware, however it’s possible malware can collect this information so use a burner account if you do. If using an Offline account, you need to click Limited experience (bottom left) on the next screen.
- Select a username and password, then fill in the 3 answers to the security questions. To be safe, do not use any credentials or identifying information.
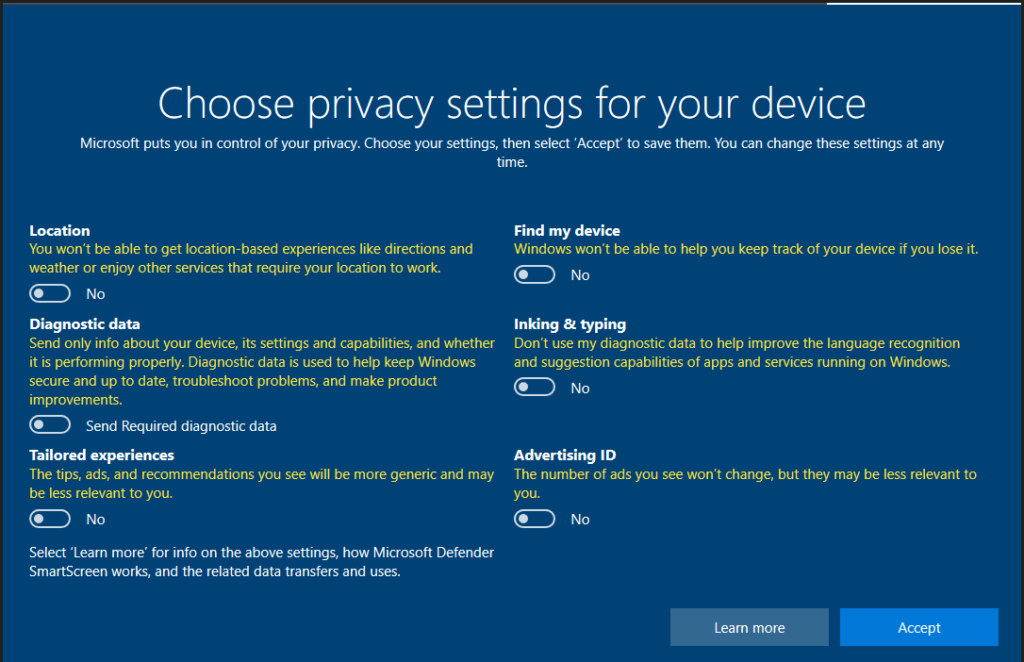
- Opt out of all the telemetry collection to try and limit the amount of network noise during our analysis.
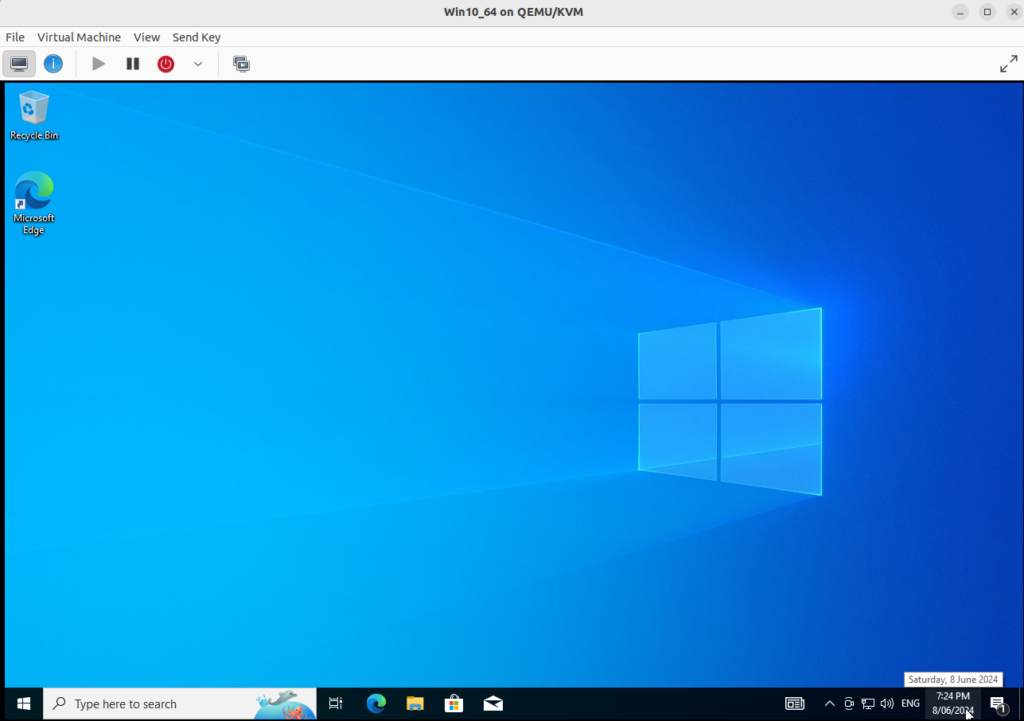
- Once Windows is installed, you will land on the desktop.
It’s now time to configure the environment. There are countless ways to configure your Sandbox Guest depending on what you’re trying to achieve. Read the CAPE Docs chapter on Sandboxing.
You may also decide to create several Sandbox Guests with different configurations, operating systems, time zone settings, language settings, etc. This way you can see how malware behaves differently based on its environment.
Configuring Windows
In the Sandbox Guest, we will be disabling all Windows security features, as well as some noisy processes. Most of the below can be achieved in multiple ways, through Windows registry changes, Group Policy Changes, and in Windows settings. There have been some attempts to script a lot of the changes which you can try.
Most of this is copied from the CAPE Docs. I suggest reading the CAPE Docs in their entirety firstly, as they’re likely to be more up to date than this guide.
- Disable Teredo from an administrative command prompt.
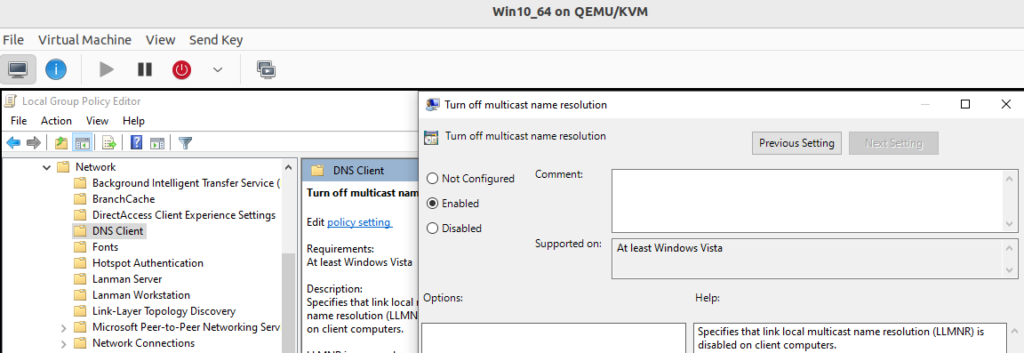
netsh interface teredo set state disabled- Turn off LLMNR. Open the Group Policy editor by typing
gpedit.mscinto the Start Menu search box, and press Enter. Then navigate to Computer Configuration > Administrative Templates > Network > DNS Client, and open Turn off multicast name resolution. Set the policy to Enabled.
- Enable Restrict Internet communication. Open the Group Policy editor by typing
gpedit.mscinto the Start Menu search box, and press Enter. Then navigate to Computer Configuration > Administrative Templates > System > Internet Communication Management, and open Restrict Internet Communication. Set the policy to Enabled. - Disable Microsoft Defender (anti-virus). Open the Group Policy editor by typing
gpedit.mscinto the Start Menu search box, and press Enter. Then navigate to Computer Configuration > Administrative Templates > Windows Components > Microsoft Defender Antivirus, and open Turn off Microsoft Defender Antivirus. Set the policy to Enabled. - Disable Read-time Protection. Open the Group Policy editor by typing
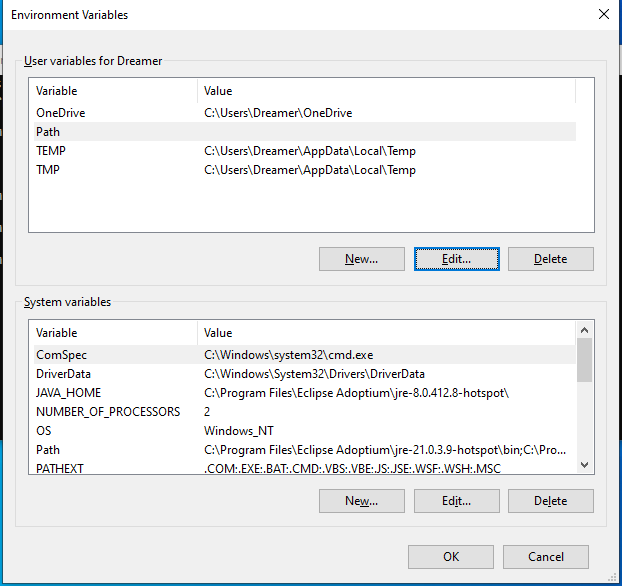
gpedit.mscinto the Start Menu search box, and press Enter. Then navigate to Computer Configuration > Administrative Templates > Windows Components > Microsoft Defender Antivirus > Real-time Protection, and open Turn off real-time protection. Set the policy to Enabled. - Disable Microsoft Store. In a command prompt, type: rundll32 sysdm.cpl,EditEnvironmentVariables and press Enter. The Environment Variables window will open. In the User variables section, edit the Path variable and remove the value so so that it’s blank.
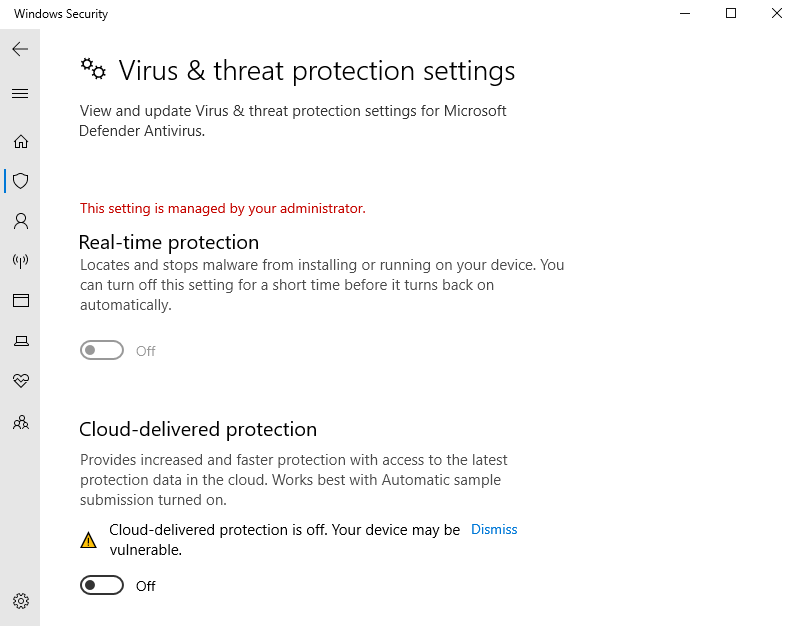
- Open up Windows Security and ensure all Virus & threat protection is disabled, including Cloud-delivered protection, Automatic sample submission, and Temper Protection.
- Do the same with Ransomware protection.
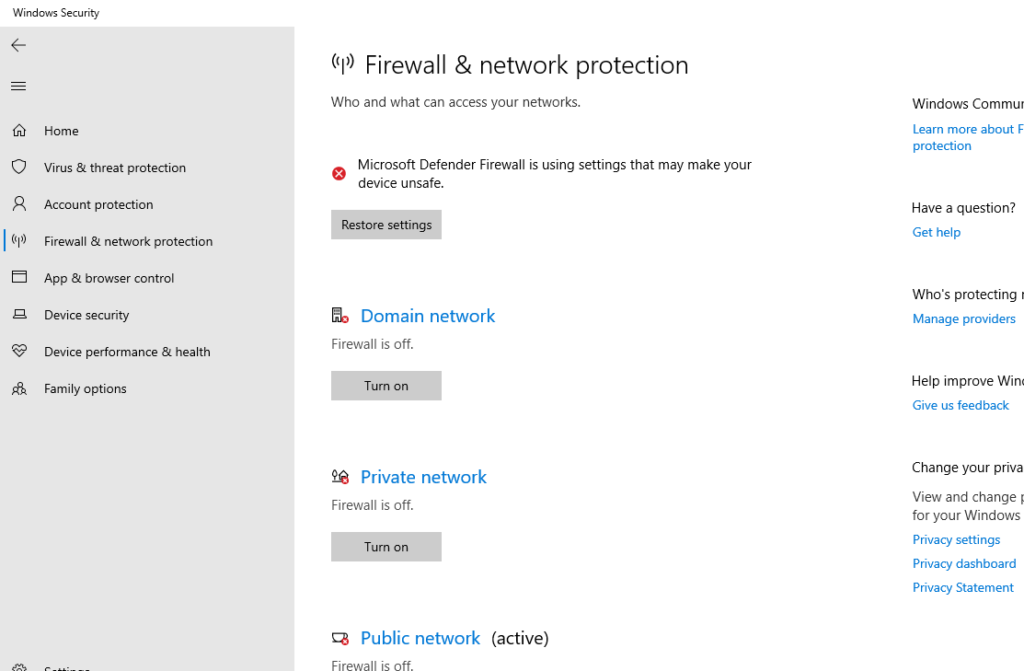
- Disable Firewall & network protection for all three networks.
- Install Sysmon. Sysmon enables enhanced logging capabilities in Windows. CAPE seems to take advantage of Sysmon logs (see auxiliary.conf) Download and extract Sysmon from Microsoft. You can also download SwiftOnSecurity’s Sysmon configuration file. Open an elevated Powershell and install Sysmon.
sysmon64.exe -accepteula -i sysmonconfig-export.xml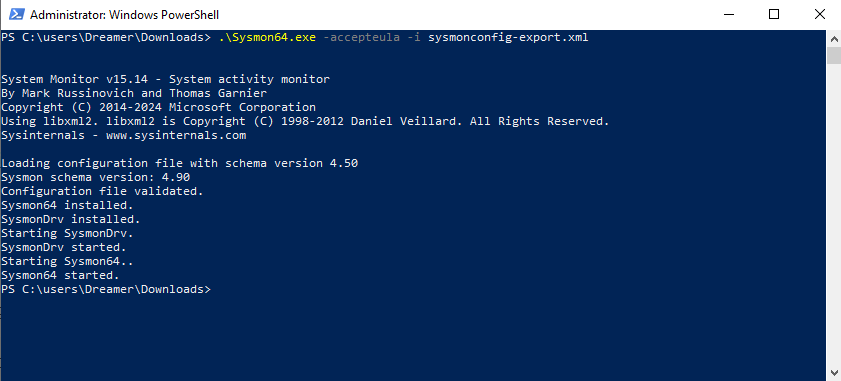
CAPE Agent & Python
The agent is a Python program which enables the communication between the Sandbox Host and the Sandbox Guest.
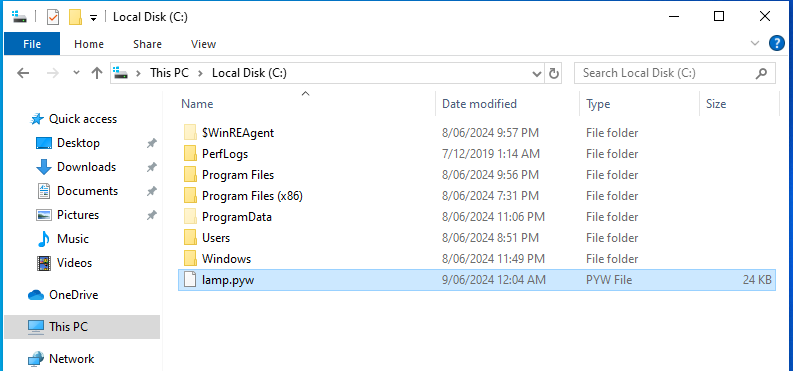
- Download the agent and place it in C:\. Rename it whatever you like, and change the file extension to .pyw so that it runs silently.
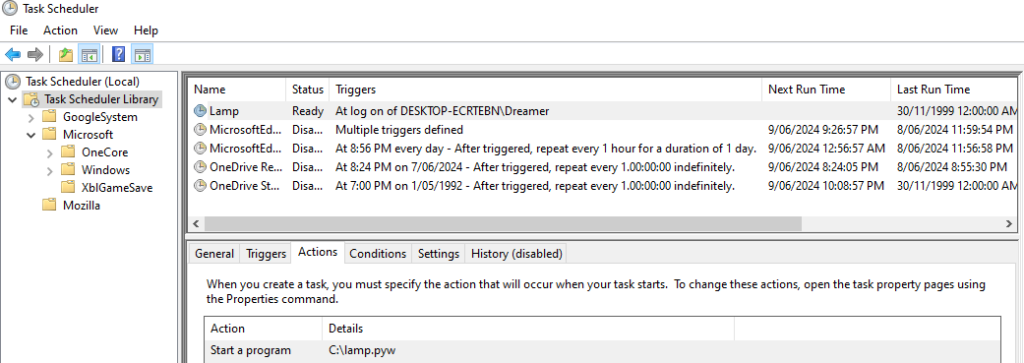
- Create a scheduled task to run the agent at user logon with highest privileges following the instructions here.
- Download the latest 32-bit version of Python from the official site.
- Run the installer as Administrator, check both check boxes and then select Customize installation.
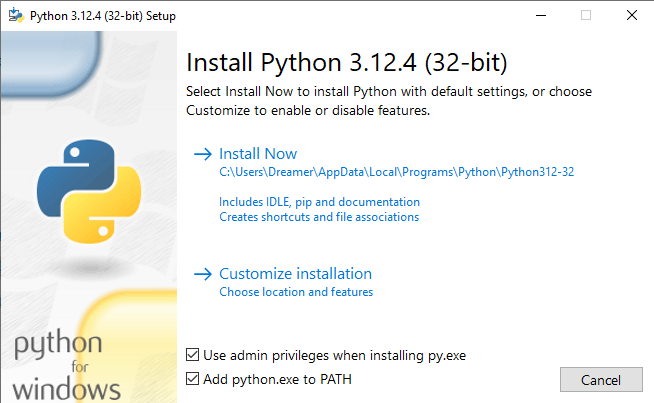
- On the next screen, leave everything checked and click Next. On the Advanced Options screen, check Install Python 2.12 for all users, then finish the installation.

- Install Pillow which will allow CAPE to take screenshots of the Sandbox Guest. From an elevated command prompt:
python -m pip install --upgrade pip
python -m pip install --upgrade Pillow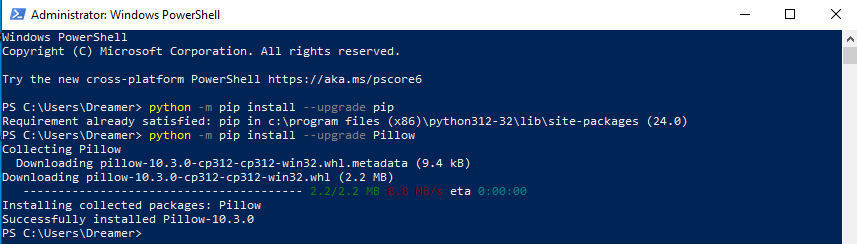
Software
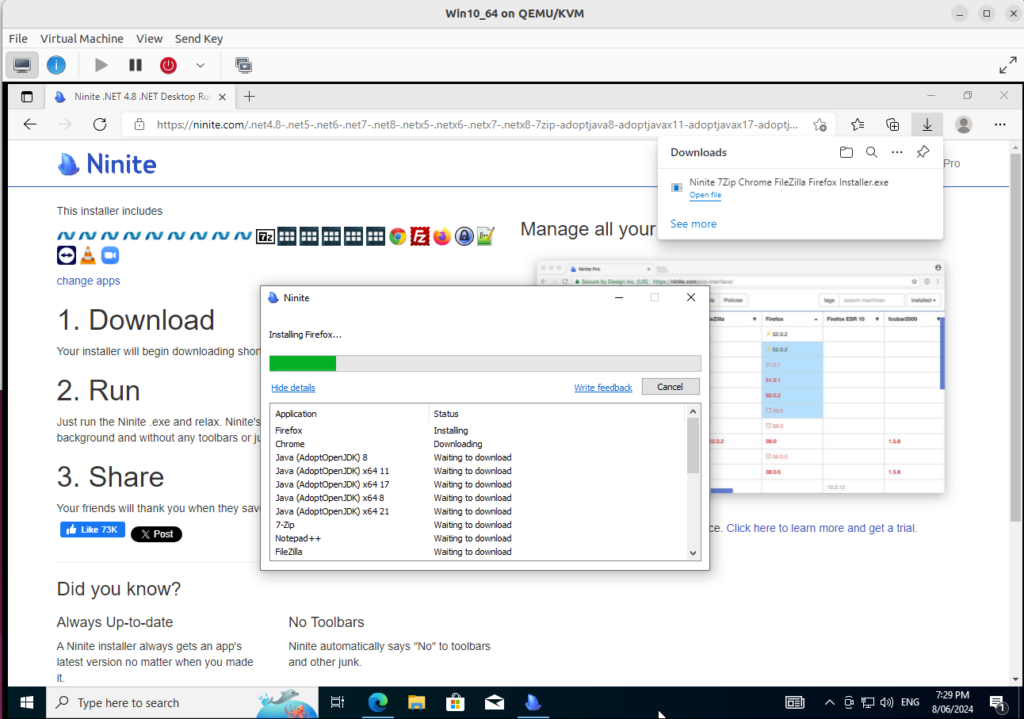
I use Ninite to quickly install all the software that makes the environment look realistic, help malware run, and give malware things to look at.
- All the browers,
- Zoom,
- VLC,
- All the Runtimes,
- 7-Zip,
- FileZilla,
- Notepad++,
- TeamViewer,
- Dropbox.
Don’t install Python from Ninite as we have to install it manually.
Microsoft Office
Microsoft Office files (.docx, .pptx, xlsx, etc) can be weaponised as malware, typically by embedding macros written in VBA code. By default, modern versions Microsoft Office protect users against inadvertently running macros. You can configure Microsoft Office to instead allow macros to run automatically, which will be helpful in analysing malicious Office files in our sandbox.
Modern versions will require you to tie a Microsoft account or an enterprise license to the installation. If you’re using one of these versions, take care not to sign in using your real Microsoft account or anything that can tie the installation back to your organisation. I’ve decided to use Microsoft Office Professional Plus 2010 which doesn’t require a Microsoft account.
- Install Microsoft Office as normal. Now we want to disable all security settings and anything which may prevent files or macros from running.
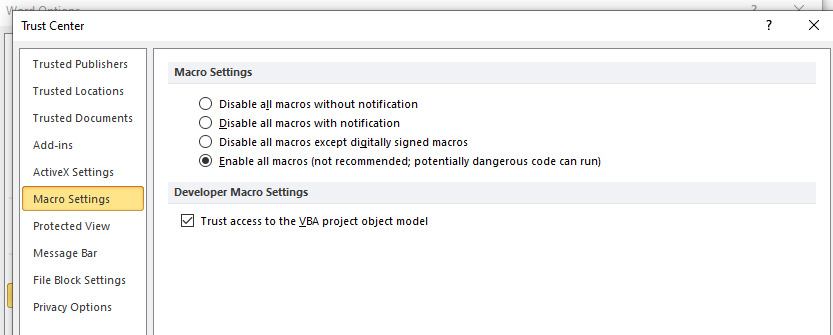
- In Word, open the Trust Center and make the following changes in Macro Settings:
- Select Enable all macros.
- Tick Trust access to the VBA project object model.
- In Trusted Locations, tick Allow Trusted Locations on my network (not recommended).
- In File Block Settings, uncheck all boxes.
- In ActiveX settings, select Enable all controls without restrictions.
- Do the same for Excel and Powerpoint.
Adobe Reader
It may be interesting to analyse PDF files.
- Download Adobe Reader from the official site. Make sure to unclick the box to include McAfee Security Scan Plus.
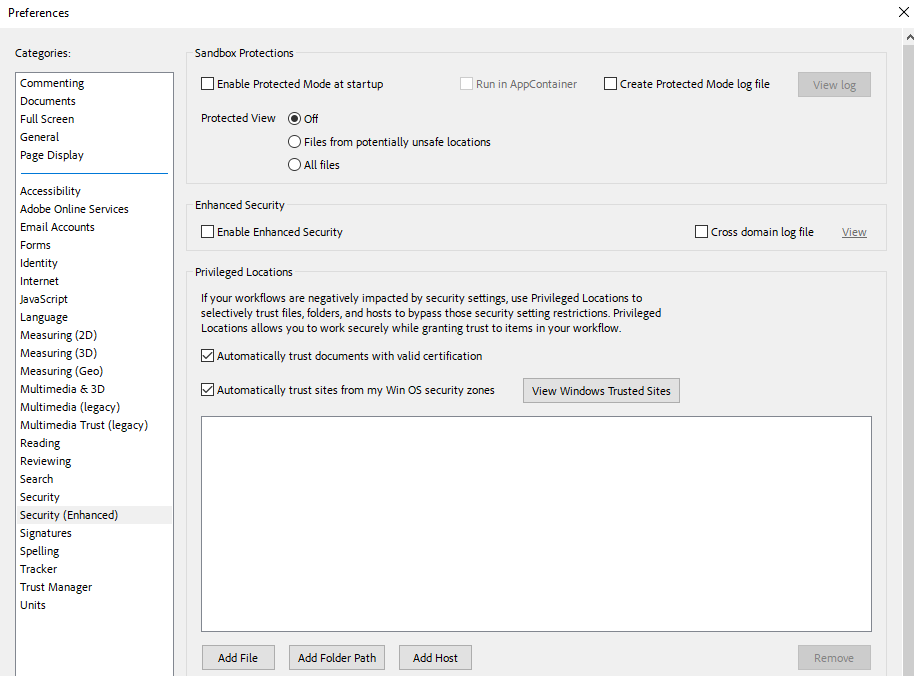
- In Adobe Reader, to Menu > Preferences > Security (Enhanced), and disable Protected Mode, AppContainer, and Enhanced Security. Enable Automatically trust documents with valid certification.
- Set Adobe Reader as the default PDF program.
Virtual Network
We need to create an isolated virtual network in Virtual Machine Manager. An isolated network will allow the Sandbox Guest to talk to the Sandbox Host, which is required for CAPE to function. This is similar to a Host Only network in VMware Workstation. Even if you want to allow the Sandbox Guest to have internet access, you can still use an isolated network as CAPE can do per-VM routing using at submission time when you run the rooter.py script which will create temporary IP tables forwarding rules on the virtual network adapter.
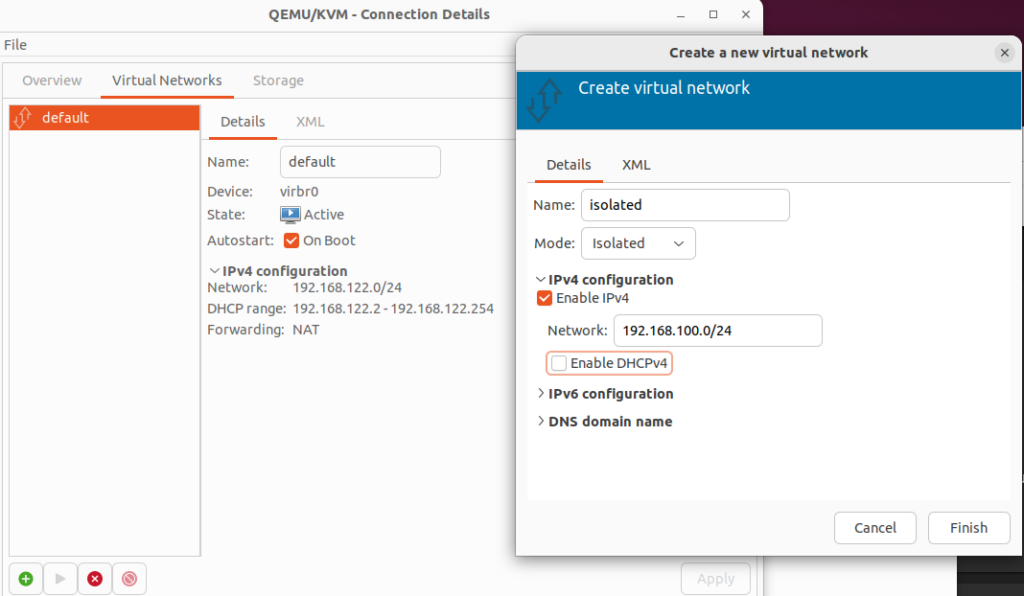
- Open Virtual Machine Manager. Go to Edit > Connection Details > and clock the + in the bottom left.
- Give the network the name ‘isolated’, set the Mode to isolated, and disable DHCP.
- Open your terminal and run ip a. You should see a new virtual network adapter for this virtual network. For me it’s virbr1.
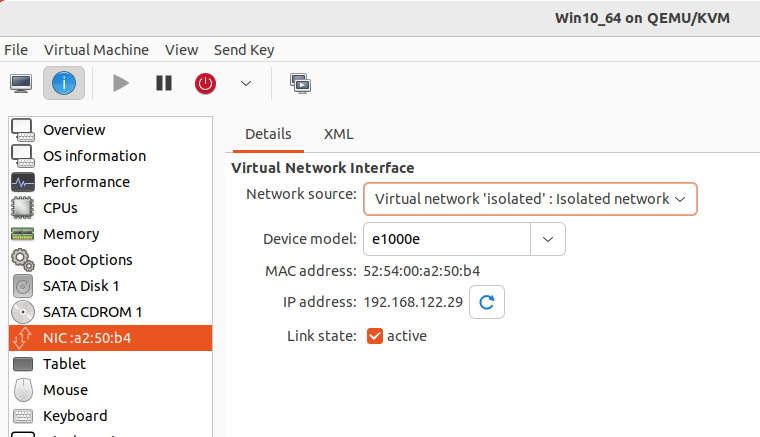
- You can now attach your virtual machine to the same network. Enter the settings of the Sandbox Guest and click on the NIC, then set the Network source to use the isolated network.
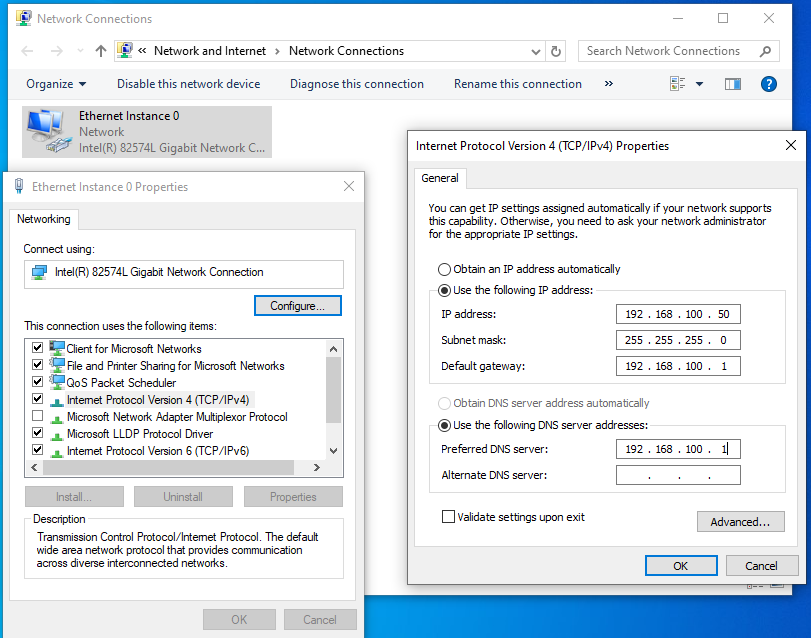
- Because we disabled DHCP, you will need to statically assign the IP address of the Sandbox Guest.
- Run ncpa.cpl from to get to the Network Connections screen, then right click on the network adapter and select Properties > Internet Protocol Version 4 (TCP/IPv4) > Properties.
- Configure an IP address on the same subnet as the isolated network. Configure the default gateway and DNS server to the IP address of the Sandbox Host (on the virbr1 network adapter).
- Test that the Sandbox Host and Sandbox Guest can communicate with each other using PING.

- You can also test that the agent is running using curl:
curl 192.168.100.50:8000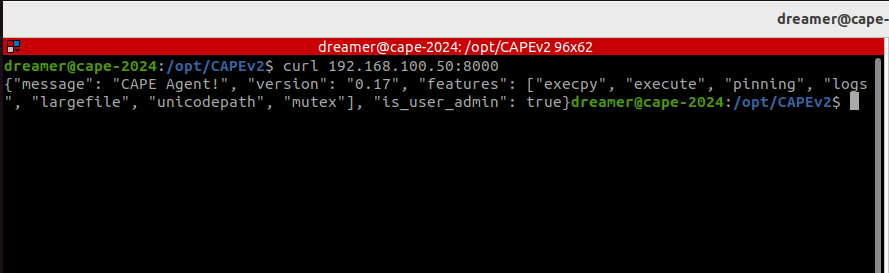
If you need to give your Sandbox Guest internet access again, you can add another NIC using and set it to NAT. Only do this from a clean state.
Configuring CAPE
Once the Sandbox Guest is ready, you have to take a snapshot. When CAPE is used to detonate malware, it will run the snapshot, and send the malware sample into the Sandbox Guest via the web server that is run by the Python agent. After CAPE times out, the snapshot will be shut down, and next time CAPE receives a submission, it will revert back to the snapshot. This ensures that each malware sample is run on a clean system.
- Close all programs so that Sandbox Guest is displaying the Desktop.
- Click on the Manage VM snapshots and click the + icon in the bottom left. Give the snapshot a name (snapshot1), and click Finish.

- Now we have to edit a few configuration files, starting with cuckoo.conf. I made the following changes:
- machinery_screenshots = on
- memory_dump = on
- freespace = 5000
- ip = 192.168.100.1 (in [resultserver])
- In kvm.conf, make sure the settings match your Sandbox Guest.
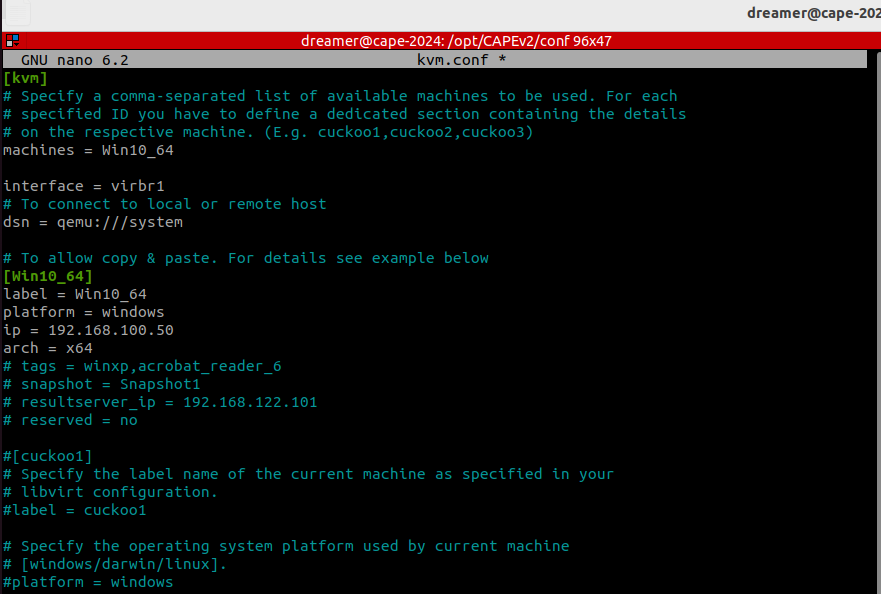
You can create additional Sandbox Guests by copying the stanza.
- In auxiliary.conf, I made the following changes:
- evtx = yes
- sysmon_windows = yes
- curtain = yes
- In web.conf, I made the following change in the [url_analysis] section so that I can analyse URLs.
- enabled = yes
There are many other settings that can be changed in the configuration files. You should take the time to understand and test out the various configurations depending on your requirements.
Usage
You should now be ready to go. To test, you can download a malware sample from MalwareBazaar. Select a file type that will run on your system, like a exe, doc, docx, etc.
- To start CAPE with verbose debugging (recommended for monitoring for errors and performance):
sudo -u cape poetry run python3 cuckoo.py -d- If you get a message that the port is already in use, that’s probably because CAPE is already running in the background as a service. You can check the log in /opt/CAPEv2/log/cuckoo.log
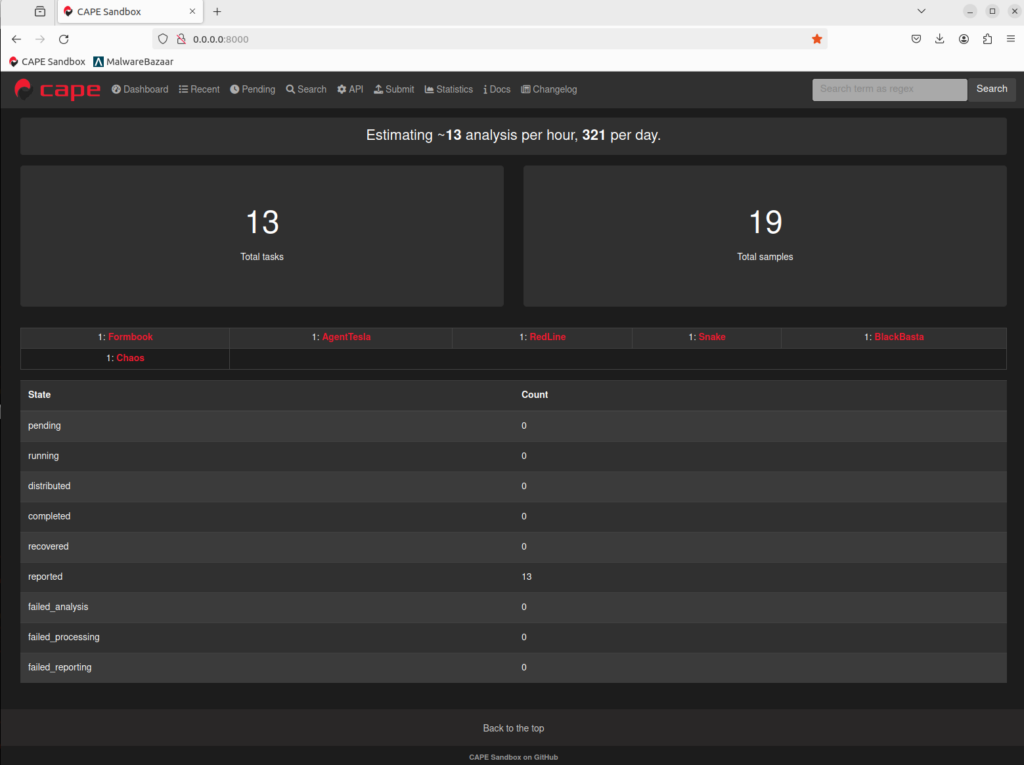
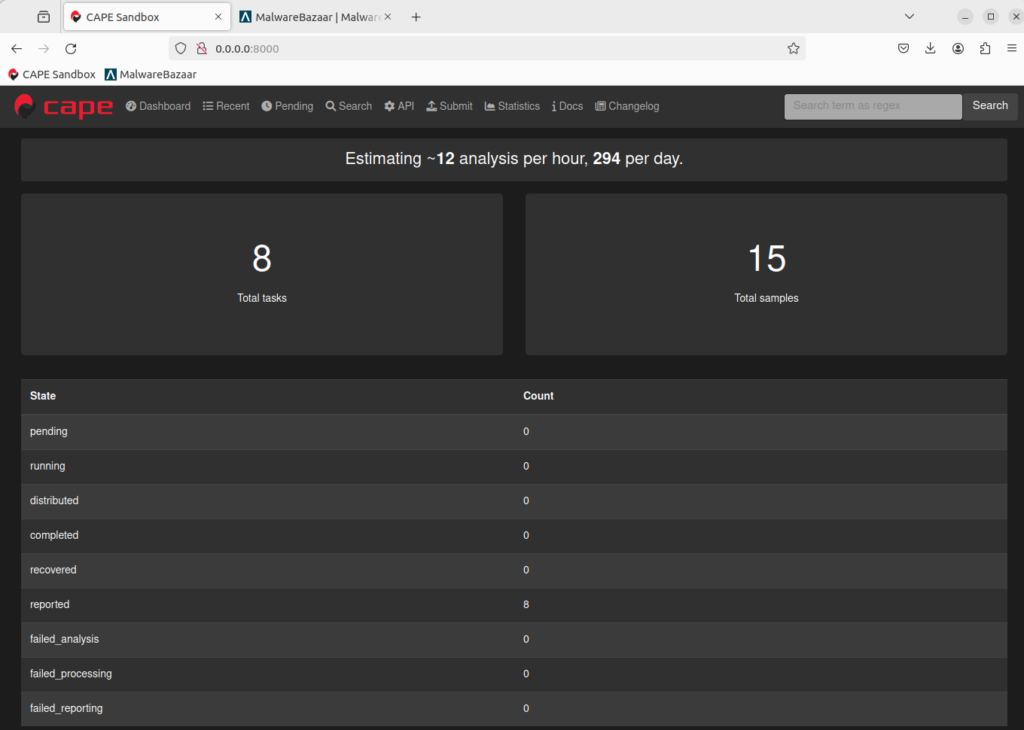
tail -f /opt/CAPEv2/log/cuckoo.log- Browse to the CAPE web application in your browser: http://0.0.0.0:8000
- Click on the Submit tab, click Select and browse to your downloaded malware sample. MalwareBazaar samples are downloaded as an encrypted archive file. The password/decryption key is ‘infected’, so you need to supply the password during the submission.
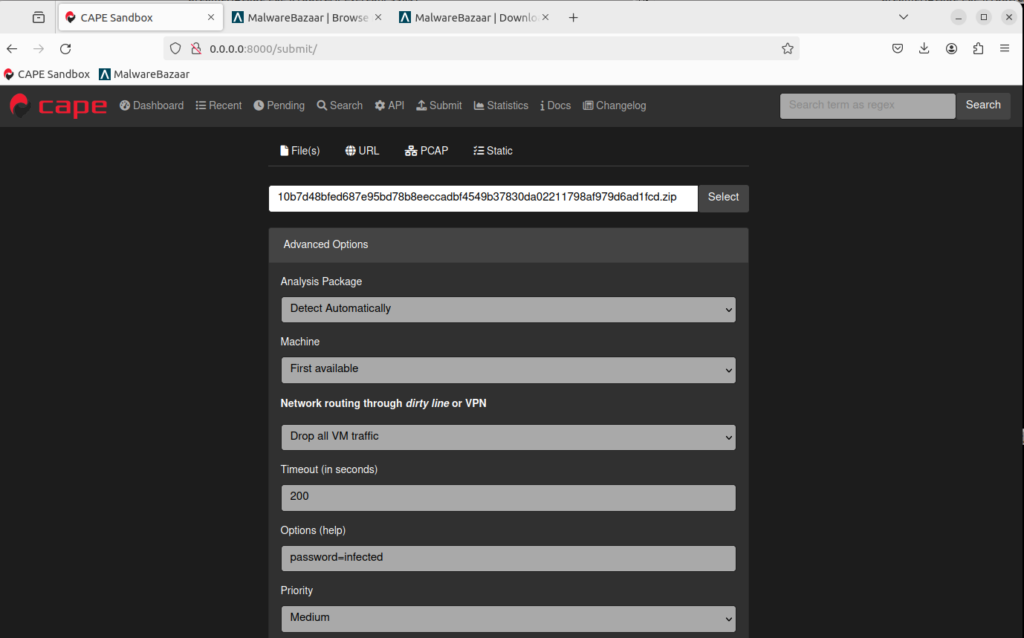
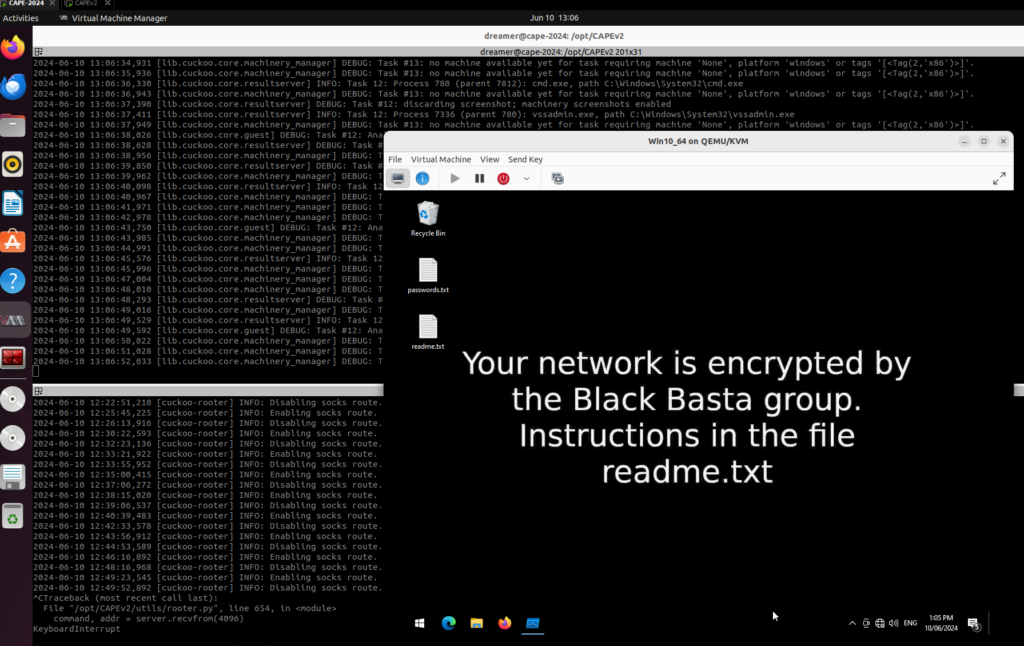
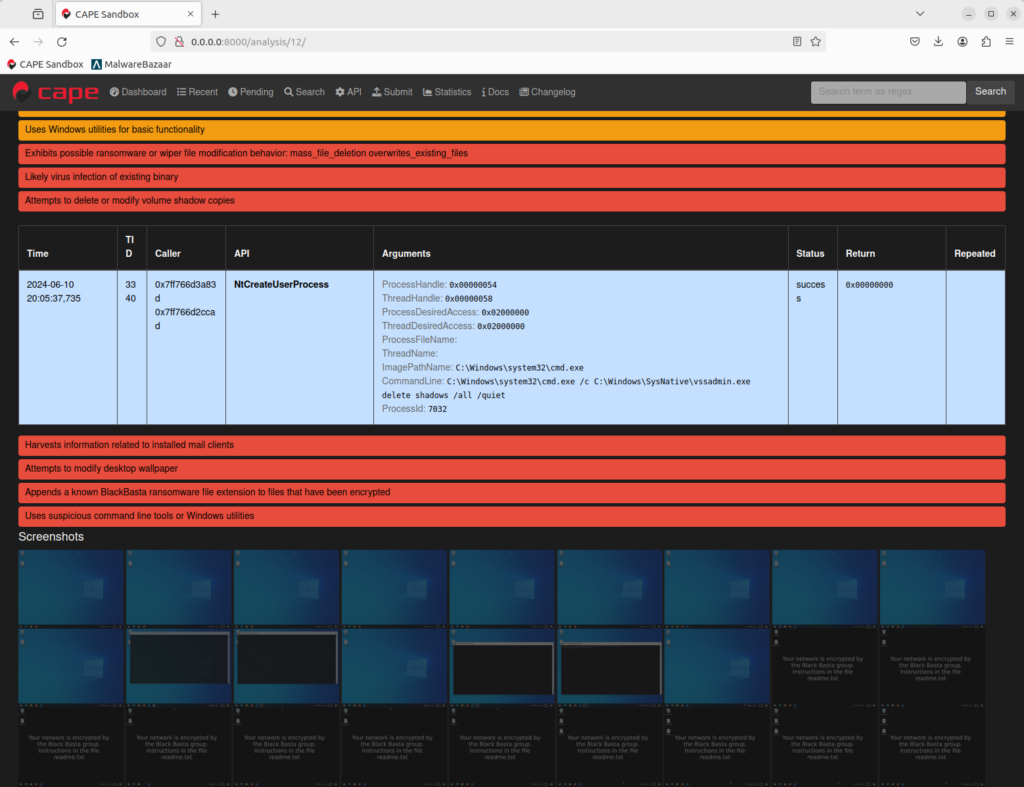
- Change the settings to your liking and then click Analyze. If you have virt-manager open, you can see the Sandbox Guest detonate the malware in real time by watching the console. Here is the Black Basta ransomware infected Sandbox Guest in real time.
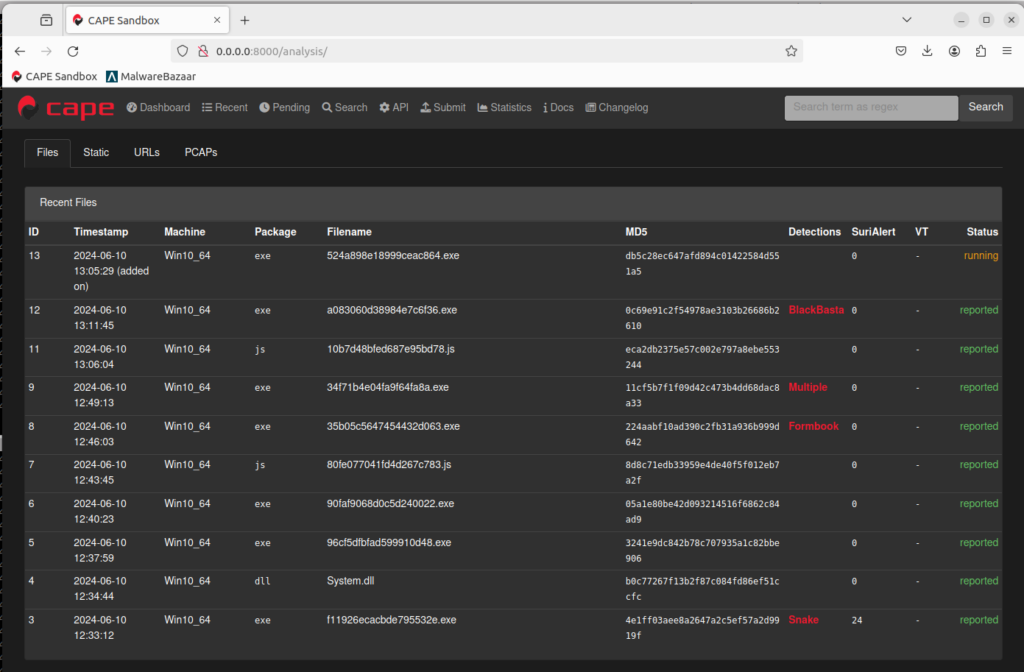
- Once the analysis has finished processing, you can view the report to view all actions performed by the malware, such as files created, deleted, or modified, scheduled tasks created, IP addresses or domains contacted, etc. You can also view screenshots of the Sandbox Guest as the malware was running.
You can stop CAPE with this command:
sudo systemctl stop cape.serviceAfter a while, your reports will take up a lot of disk space, especially if you have screenshots enabled. You can free up disk space by cleaning all previously run tasks and reports. When I run this I get a lot of warning errors but it seems to work:
sudo -u cape poetry run python /opt/CAPEv2/utils/cleaners.py --cleanThere we have it – a fully functional setup to get most people started with CAPE. There is a lot more you can do with CAPE Sandbox by customising the configuration files and using the third-party integrations. In a future post, I will go through the various options for giving the Sandbox Guest internet access without revealing your real IP address.
Resources
If you run into any errors, check through the official docs, GitHub issues, and Google.
You can also check some other helpful CAPE installation and configuration guides for more ideas and information:
- Step-by-Step Guide of Installing and Configuring CAPEv2 Sandbox on Ubuntu 22.04 [Part 1]
- Step-by-Step Guide of Installing and Configuring CAPEv2 Sandbox on Ubuntu 22.04 [Part 2]
- CAPEv2 Sandbox Installation Part 1 – Up and Running with the Basics
- Using CAPE Sandbox and FOG to analyze malware on physical machines
- CAPE Sandbox installation from 0 to hero
You should also watch Kevin O’Reilly’s (CAPE Developer) presentation from 2019 on malware obfuscation and using CAPE to analyse malware: https://www.youtube.com/watch?v=qEwBGGgWgOM
Share this content:


Related Posts